
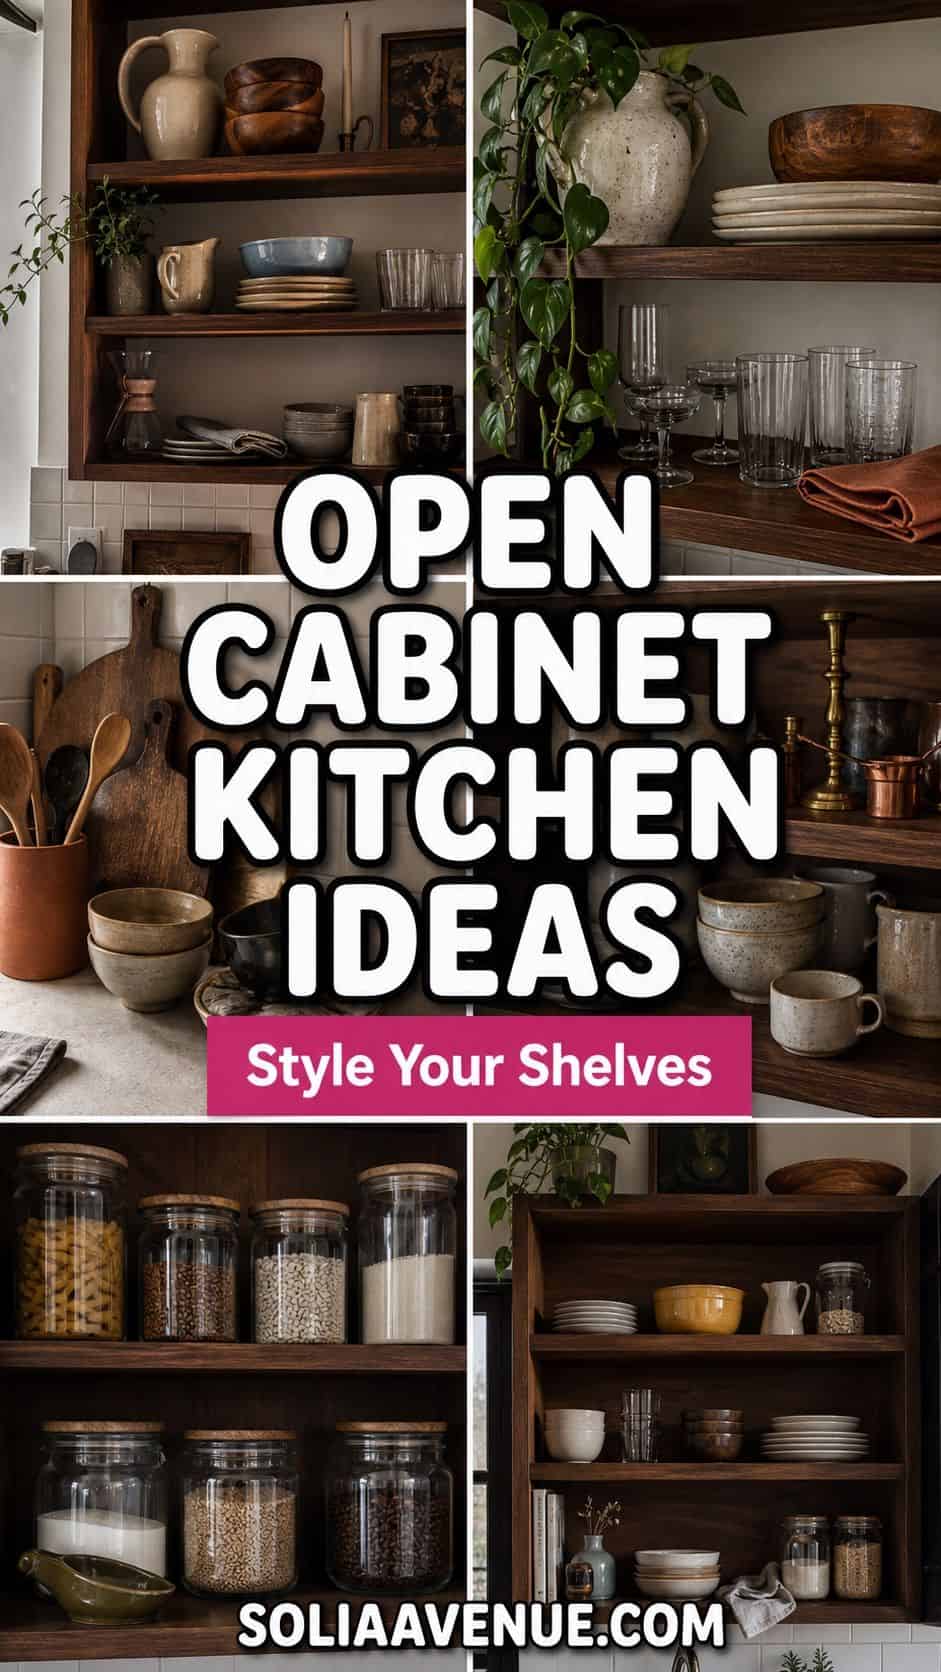
Quick Answer: The best open cabinet kitchen decor ideas use the rule of thirds for grouping objects, layer three heights on each shelf, mix wood and ceramic textures for warmth, and anchor with a repeating color across the full run of shelves. Display everyday dishes that read as considered rather than cluttered.
Has the open shelving in your kitchen turned into a place where dishes go to wait for the dishwasher? Open cabinets are the highest-stakes styling move in any kitchen, because everything is visible and the rest of the room reads off whatever is on those shelves.
The good news is that styling open shelves is more formula than instinct, once you know what the formulas are. The triangle rule, the rule of thirds, three heights per shelf, a repeating color across the run. Apply two or three of these and the shelves stop looking like storage and start looking like a styled vignette that happens to hold your everyday dishes.
Want every shelf in the kitchen to look like a magazine photo?
The Aesthetic Apartment Makeover Guide breaks down styling formulas for every room. $17 now, soon $27.
Recommended Open Kitchen Shelf Decor Essentials
The styling pieces that make open kitchen shelves look intentional, ceramic vessels, wood cutting boards, glass canisters, brass accents, and under-shelf lights.


Recommended blogs to read:
- Kitchen Cabinet Organization Ideas
- Kitchen Cabinet Color Ideas
- Modern Kitchen Cabinet Design
- Kitchen Counter Decor Ideas
- Corner Shelf Decor Ideas
Styling Formulas That Make Shelves Look Intentional
1. Layer Wood and Ceramic for Texture Contrast


The single fastest way to make an open shelf look intentional is to mix two contrasting materials within the same shelf. Wood next to ceramic is the classic pairing because the warm grain of the wood softens the cold smoothness of the ceramic, and the contrast makes both materials look more deliberate.
A stack of acacia cutting boards leaned upright on the back of the shelf, with a glazed white ceramic pitcher in front of them, reads as a considered grouping in 30 seconds. Repeat the wood-and-ceramic pairing across each shelf to tie the whole open cabinet run together visually.
If you want a third texture without breaking the effect, woven and matte both play well here, a small rattan basket or an unglazed stoneware bowl slots in without competing. The pairing also hides a practical truth, wood pieces tend to be the ones you actually use, so leaning them out in the open means your most-reached-for boards are never buried in a drawer.
Read more: Top 15 Kitchen Corner Cabinet Ideas to Maximize Every Inch
2. Style by the Rule of Thirds


Group items in odd numbers, usually threes, with one tall element, one medium, and one short. The eye reads triangular compositions as balanced even when the contents are different sizes and shapes, which is why every styled magazine shelf uses some variant of this rule.
A tall vase or pitcher anchors the back, a medium stack of books or a horizontal serving board sits in the middle, and a small ceramic bowl or candle finishes the front. Three items per group is enough to read as styled without crossing into cluttered.
One thing photos never tell you is that the triangle works in depth, not just left to right, so push the tall piece toward the back wall and let the short one sit near the shelf edge. That front-to-back stagger is what gives a flat shelf the layered, gathered-over-time look. If a shelf still feels stiff, pull one object a few inches off-center and the whole group relaxes.
Read more: Top 15 Outdoor Kitchen Patio Decor Ideas to Enhance Your Backyard
3. Mix Heights with Risers and Stacked Books


Flat objects sitting at the same height read as a row of items, which is the visual definition of cluttered. Adding a small wooden riser or a stack of clothbound hardback books under one object instantly creates the height variation that makes a shelf look styled.
Three-inch wooden risers in walnut or oak work under ceramic bowls. Vintage hardback cookbooks stacked two or three high lift a small plant or candle to mid-shelf height. The cost is essentially zero and the visual improvement is immediate.
If you do not have cookbooks to spare, an upturned bowl or a small wooden box does the same lifting job hidden underneath the object on top. The goal is simply to make sure no two neighboring objects share an eye line, since matching heights are what make a shelf read as inventory rather than decor. A quick test: photograph the shelf, and if the tops of everything form a straight line, something needs to go up or come down.
4. Anchor with a Repeating Color


Pick one accent color and repeat it across every shelf, usually in the form of a single object per shelf. Black ceramic on every shelf, or burgundy book bindings, or brass candlesticks. The repeat tells the eye the shelves are one composition rather than three separate ones.
Keep the rest of the items in a neutral palette so the accent color reads cleanly. White ceramic, wood, and one repeating color is the cleanest open-shelf palette you can build. Add nothing else and the shelves look editorial.
Pick the accent color from something already in the room, the cabinet hardware, a tile, the window trim, and the shelves will feel connected to the kitchen instead of stuck on. Spacing the repeat matters too: if the accent piece sits in the same corner of every shelf, the eye reads it as a stripe, so shift it left, center, right as you move up the run for a looser rhythm.
Read more: Top 16 Corner Sink Kitchen Decor Ideas for the Best Seat in the
5. Add Trailing Greenery for Softness


A single trailing plant on the top shelf adds the only soft, irregular element on an otherwise rigid open shelf composition, which is exactly why styled shelves always include greenery. Pothos, philodendron, and string of pearls all trail well and tolerate low kitchen light.
The pot should match the rest of the shelf palette, usually unglazed terracotta or a small ceramic in your accent color. The trailing leaves break up the hard horizontal line of the shelf edge and add the organic curve the rest of the composition lacks.
Place trailing plants on the highest shelf so the vines fall through open air rather than draping over the dishes below. If your kitchen light is genuinely dim, a good faux pothos has come a long way and reads convincingly from a few feet back, which is all anyone gets on a kitchen shelf. Real plants do reward you, though, since you can rotate the pot every couple of weeks to keep the growth even.
Read more: Top 17 Kitchen Counter Corner Decor Ideas for Functional Beauty
Object Choices That Pull Their Weight
6. Use Cutting Boards as Decor


Cutting boards leaned upright on the back of the shelf are the cheat code for warm open-shelf styling. They look intentional, they double as functional kitchen items you actually use, and they take up almost no shelf depth because they lean flat against the back wall.
Layer two or three boards of different woods and sizes for visual depth. Acacia, walnut, and white oak in a row read as a considered collection. Wipe with food-safe mineral oil quarterly to keep the wood color rich and prevent drying.
Boards with a built-in handle hole earn their spot twice over, since you can also hang one from a small hook under the shelf to free up surface space. Vary the shapes a little, a round paddle next to two rectangles keeps the lean-up from looking like a sale display. Keep your roughest chopping board out of the lineup and reserve the prettiest one for actual serving, so the styling never gets scarred.
Read more: Top 16 Christmas Kitchen Decor Ideas for a Warm Holiday Heart of the
7. Display Everyday Dishes That Look considered


Stack matching plates and bowls in clean, even rows. The right move is using one color or pattern for the whole set so the stack reads as a single visual block rather than as randomness. Cream stoneware, white porcelain, or all-black matte plates are the easiest to keep looking styled.
Limit each shelf to one or two stack heights so the silhouette stays clean. A stack of eight matching dinner plates next to a stack of eight matching bowls is enough composition on a single shelf. Function and decor become the same thing.
If your everyday set is a mismatched mix you cannot replace right now, pull the cleanest-looking pieces forward and tuck the odd ones behind, where no one sees them but you still get to use them. Stacking plates with a felt or paper separator between each one also keeps the glaze from scratching, which matters when the set is on display and getting handled daily. The bowls tend to photograph best slightly off to one side rather than dead center.
Read more: Top 16 Spring Decor Ideas for the Kitchen That Feel Bright and Clean
8. Add a Single Statement Ceramic per Shelf


Every shelf needs one piece that exists purely for styling, with no practical kitchen function. A handmade ceramic vessel, a small piece of pottery, a sculptural object. This is the element that separates a styled shelf from a storage shelf.
The statement piece should be the tallest or most-visually-interesting object on the shelf, and it should differ from anything else on it. One per shelf is enough. More than that and the shelves start looking like a gallery rather than a kitchen.
This is the one spot where a small splurge pays off, since a handmade piece with visible throwing lines or an uneven glaze brings a warmth that mass-produced decor cannot fake. Local pottery studios, craft fairs, and secondhand shops are full of these for the price of a chain-store vase. If budget is tight, a single found object, a smooth river stone, a piece of driftwood, an interesting bottle, does the same job of breaking the pattern.
9. Style with Wood-Handled Utensil Crocks


A ceramic crock filled with wood-handled cooking utensils gives you styling and accessibility in one move. The crock counts as a vase-shape on the shelf, the utensils inside read as a textural detail, and you can grab a wooden spoon while cooking without opening a drawer.
Matte ceramic crocks in cream, taupe, or charcoal work in most kitchens. Fill with five to seven utensils so the silhouette stays full but not overstuffed. Trim handles to similar lengths if the originals vary too widely for visual cohesion.
Keep only the utensils you genuinely reach for in the crock and stash the rest in a drawer, since a jar crammed with fifteen tools reads as clutter no matter how nice the jar is. Turn the business ends down and the handles up, so the silhouette is clean wood rather than a bristle of whisk wires and spatula heads. A crock placed near the stove also doubles as the most useful piece of decor on the shelf.
Read more: Top 18 Halloween Kitchen Decor Ideas for a Spooky, Stylish Space
10. Include a Small Framed Art Print


A small leaning art print on a kitchen shelf signals the room is more than utility. Botanical prints, vintage market posters, or minimalist line drawings work because they reinforce the kitchen theme without being too literal.
Frame size between five-by-seven and eight-by-ten fits comfortably on a shelf without dominating. Lean the print against the back wall rather than mounting it so you can rearrange the shelf without re-hanging anything. The print adds a layered visual depth that shelves with only objects cannot reach.
Let a shorter object overlap the bottom corner of the frame so the print looks gathered into the group rather than propped behind it. Choose a frame in a finish you already have on the shelf, the same wood tone or a thin black edge, so the art reads as part of the styling. A small print also gives you the cheapest seasonal swap there is, since changing the art changes the mood of the whole shelf for a few dollars.
Read more: Top 18 Winter Kitchen Decor Ideas That Make Cooking Season Feel
11. Use Glass Canisters for Pantry Staples


Glass jars filled with pasta, beans, flour, sugar, and coffee turn pantry storage into open-shelf decor. The uniform glass shapes and visible contents read as styled even though every jar is purely functional storage.
Matching lid colors across all the jars unify the look further. Black lids, wood lids, or stainless steel all work. Label each jar with a small chalk-marker tag so you know what is inside without opening it. The styling cost is zero because the jars also solve a real pantry problem.
The contents do a lot of quiet work, since dried pasta, layered beans, and amber lentils each bring a different color and texture to the row for free. Group jars by height rather than scattering tall and short at random, and the line of lids stays tidy across the shelf. Airtight gaskets are worth the extra dollar or two per jar, because food on an open shelf is exposed to light and air all day and you want it to last.
Read more: Top 18 Easy Kitchen Summer Decor Ideas for Renters
12. Layer in Vintage Brass or Copper Pieces


A single vintage brass candlestick, copper measuring cup set, or small brass vase adds the metal element that makes neutral kitchen shelves feel collected rather than store-bought. The patina on real vintage pieces reads warmer than new pieces that try to imitate the look.
Limit metal pieces to one or two per shelf to avoid the shelf reading as cluttered. Thrift store and estate sale finds work, since slightly imperfect or patinaed pieces look better than perfect new ones in this context.
Stick to one metal family across the run, all warm brass and copper or all cool steel, so the shelves do not read as a mismatched hardware bin. If a thrifted brass piece has gone dull past the point of charm, a quick rub with a lemon-and-salt paste brings the glow back, but stop before it looks factory-new since a little age is the whole appeal. Set metal where light can catch it and the shelf gets a small spark without another color entering the mix.
Read more: Top 16 Summer Kitchen Tray Decor Ideas to Style in Minutes
Final Polish Moves
13. Style the Bottom Shelf Differently from the Top


The bottom shelf is closer to the counter and reads at a different visual level than the top. Treat it as a more functional zone, with larger objects like big serving bowls, pitchers, or stacks of platters. Save the small ceramic and styling pieces for the upper shelves where they sit at eye level.
The top shelf is the styling shelf, the bottom shelf is the storage shelf. Apply the rule and the open cabinet stops looking like a single block of decor and starts reading as a layered, functional kitchen setup with deliberate styling on top.
There is a practical logic underneath this too, since the heavier serving pieces belong low where they are easy to lift down without reaching overhead. Keep the daily-use items, mugs, the everyday plates, on whichever shelf your hand lands on naturally, and save the highest shelf for the things you touch least. When form follows how you actually move through the kitchen, the styling holds up because nothing gets shoved out of place mid-week.
14. Add Under-Shelf Lighting for Evening Glow


LED strip lights mounted under each open shelf transform the kitchen at night, both because they light the counter for prep and because the ambient glow makes the shelves themselves look like a styled display rather than utilitarian storage.
Look for warm-white strips at 2700K to 3000K for the right cozy color temperature. Battery-operated or plug-in versions work without an electrician. The under-shelf glow is the single move that takes daytime-functional shelves into evening-styled vignette territory.
Mount the strip toward the front edge of the shelf underside so the light washes down the face of the objects below, not just the back wall. A model with a small remote or a dimmer lets you drop the brightness for a dinner glow and bring it back up for actual cooking. Tuck the cord along the cabinet seam and run it to the nearest outlet, and the wiring disappears while the effect stays.
Read more: Top 17 Warm Thanksgiving Kitchen Decor Ideas for Your Holiday Cooking
15. Remove Cabinet Doors for a Rental-Friendly Open Look


If you are renting and want open shelves without a renovation, simply remove the cabinet doors and store them somewhere safe. The cabinet box becomes an open shelf instantly, and you can reinstall the doors when you move out.
Label each door with painter tape so you can return them to the correct cabinet. Paint the cabinet box interior a contrasting color, usually a warm white or a soft sage, for extra styling impact. The whole conversion takes 30 minutes with a screwdriver and is completely reversible.
Bag the hinges and screws separately and tape the bag to the back of its matching door, since a stray screw a year later is the only thing standing between you and your deposit. If painting the box is not allowed, removable peel-and-stick wallpaper on the back panel gives the same pop of color and peels off clean. Doing just one or two cabinets, rather than the whole kitchen, keeps the look intentional and the styling workload realistic.
Read more: Top 15 Small Apartment Kitchen Decor Ideas That Make Tiny Counters
Ready to turn the entire kitchen into a considered space?
The Aesthetic Apartment Makeover Guide covers every room with real, budget-friendly ideas. Currently just $17 before the price goes up to $27.
Frequently Asked Questions
How do you style open cabinet kitchen shelves to look professionally designed?
Use the rule of thirds, layer three heights on every shelf, mix wood and ceramic textures, and anchor the entire run of shelves with one repeating accent color. These four formulas are what separate styled shelves from cluttered ones.
What should you put on open kitchen shelves?
Mix functional items like matching dishes, cutting boards, and glass canisters with styling pieces like ceramic vases, small art prints, and trailing plants. Aim for 70 percent functional and 30 percent purely decorative on each shelf.
How do you keep open kitchen shelves from looking cluttered?
Group items in threes, leave intentional empty space between groupings, and limit accent colors to one or two repeating tones across the entire run of shelves. White space is as important as the objects themselves.
Can I remove kitchen cabinet doors if I am renting?
Yes, removing cabinet doors is fully reversible. Unscrew the hinges from the cabinet box, label each door with painter tape, and store the doors and hinges flat in a closet. Reinstall before moving out and the cabinets return to their original state.
How often should I restyle open kitchen shelves?
Restyle quarterly with seasonal swaps, like adding small pumpkins in fall or evergreen sprigs in winter. The base styling can stay for a year or more, only swap in or out one or two accent pieces per season for variety without disrupting the foundation.
Key Takeaways
- Open shelves need the rule of thirds, three heights per shelf, and a repeating accent color.
- Cutting boards leaned upright are the cheat code for warm, intentional styling.
- Mix functional items with one or two purely decorative pieces per shelf.
- Under-shelf LED lighting turns daytime functional shelves into evening vignettes.
- Removing cabinet doors creates rental-friendly open shelves in 30 minutes.
Final Thoughts
Open kitchen shelves are the highest-stakes styling move in the room because every object is visible at all times, which means every styling choice shows. The four formulas, rule of thirds, three heights, mixed textures, and a repeating color, are enough to make any shelf look intentional. Add a single statement ceramic and a trailing plant per shelf, light the run with under-shelf LEDs, and the kitchen reads as styled rather than stored.
Last update on 2026-07-01 / Affiliate links / Images from Amazon Product Advertising API